Reproducible environments#
Best Practices in Modern Software Development: 23.11.23
Min Ragan-Kelley
A module is a file consisting of Python code
A package is a hierarchical file directory structure that consists of modules and sub-packages

Using modules#
import itertools
# Access function from the module
itertools.product

# Alias
import itertools as itools
itools.product

# The following is considered a bad practice
from itertools import *
# Easy to shadow existing variables (also hard for IDEs)
Using packages#
from scipy.optimize import minimize
#      ^      ^               ^
#      |      |               |
#   Package   |               |
#           Module            |
#                          Function
Where does Python find modules?#
In [1]: import asyncio, numpy

In [2]: asyncio.__file__
Out[2]: '/usr/local/lib/python3.12/asyncio/__init__.py'

In [3]: numpy.__file__
Out[3]: '/home/myname/.local/lib/python3.12/site-packages/numpy/__init__.py'
How does python know which modules and packages that are available?#
import sys

sys.path
['',
 '/usr/local/lib/python312.zip',
 '/usr/local/lib/python3.12',
 '/usr/local/lib/python3.12/lib-dynload',
 '/home/myname/.local/lib/python3.12/site-packages',
 '/usr/local/lib/python3.12/site-packages']
The order is important!
What is an environment?#
An environment is where you install your software, isolated from your system and other projects. Why?
Conflicting dependency versions
Easier to upgrade
Easier to dispose of and start for scratch
Portable
It’s always a good idea to use environments!
Three main options
Python virtual environments
Conda environments
Containers (Docker)
How and why to specify environments#
An environment specification is a portable description of what packages should go in an environment.
When you specify your environment, it’s easier to reproduce your environment, or at least compare it with theirs.
Tools turn specifications into environments (and vice versa!)
pip-requirements.txtconda-environment.ymlDocker-Dockerfile
Python virtual environments#
Python comes with a built-in tool for creating virtual environments
python3 -m venv ./my-env
This will create a folder called
my-envcontaining your virtual environment
Activate virtual environment
source ./my-env/bin/activate
Now you can install the dependencies you need
python3 -m pip install pandas
To deactivate your virtual environment, type
deactivate
Demo#
creating a virtual environment
Exercise#
Create two different virtual environments called latest and old-pandas, one where you install the latest version of pandas and one where you install pandas version lower than 2.0
Verify the version using
python3 -c "import pandas; print(pandas.__version__)"
Example#
python3 -m venv latest
. latest/bin/activate
python3 -m pip install pandas
python3 -m venv old-pandas
. old-pandas/bin/activate
python3 -m pip install "pandas<2.0"
deactivate
Creating a pyproject.toml#
pyproject.tomlis the recommended way to specify project metadata for Python projectsMinimum metadata
name
version
authors
license
dependencies
Example pyproject.toml#
[build-system]
requires = ["setuptools>=64.4.0"]
build-backend = "setuptools.build_meta"


[project]
name = "my-paper"
version = "0.1.0"
dependencies = [
  "numpy",
]

[tool.setuptools]
# empty packages when your project not a 'real' package
# (i.e. only dependencies, nothing to actually install)
packages = []
Exercise#
Add
numpy,scipy, andnumbaas dependencies in yourpyproject.tomlTry to install these dependencies in your virtual environment by typing
python3 -m pip install -e .
Extra dependencies for development#
You might want to use some other libraries when developing the software, or other specific tasks (such as
pip-toolsorpytest)These libraries should not be required when installing the software, but it is nice for other developer to have an easy way to discover and install them
You can list these in
pyproject.tomlunderproject.optional-dependencies
Specifying optional dependencies in pyproject.toml#
[project.optional-dependencies]
test = [
    "pytest",
    "pytest-cov",
]
dev = [
    "pdbpp",
    "ipython",
    "tbump",
    "pre-commit",
    "pip-tools",
]
all = [
   "my-project[test,dev]"
]
Installing optional dependencies#
Use
python3 -m pip install ".[dev]"
to install the package in the current directory and its optional ‘dev’ dependencies.
To install several optional dependencies you can separate the names with comma
python3 -m pip install ".[dev,test]"
Pinning exact versions of the libraries you use#
To ensure reproducible results, it is important that you specify the exact versions of the libraries you used and all their dependencies
You can export your current environment at any time in
requirements.txtformat withpip freeze
But you shouldn’t specify these as your direct dependencies! (never put
pandas==2.1.2in your dependencies by hand)We can use a tool called
pip-compile(install withpip install pip-tools) to pin all the versions based on yourpyproject.toml
Pinning with pip-tools#
pip-compile is like pip install followed by pip freeze, but without actually installing anything
Use
pip-compile pyproject.toml
to create a file
requirements.txtcontaining all packages you use, directly or indirectlyYou can now install the exact dependencies using the command
python3 -m pip install -r requirements.txt
pip-tools and dependabot can be used to update
requirements.txtwhen you want to.
Pinning optional dependencies#
It might be beneficial to pin some of your optional dependencies:
pip-compile --extra=dev --output-file=requirements-dev.txt pyproject.toml
Here we save these dependencies to a different file called
requirements-dev.txt, which can be installed usingpython3 -m pip install -r requirements-dev.txt
When to pin#
It can be hard to know when to pin dependencies and when not to. Pinned packages help ensure reproducible results. But they also prevent compatibility with other projects.
It’s a good idea to use pinned dependencies when you are:
building reproducible results
building a container image
rendering a website
operating a service
When not to pin#
In package dependencies
Running tests (maybe!)
When you want to share an environment with another tool
Short answer: always good to have both!
always track loose, direct dependencies
track pinned dependencies separately, using tools, not by hand
which to install depends on what you are doing
Virtual environment tools#
While we have made some recommendations, there are a variety of tools for managing Python dependencies and environments:
You don’t have to use the tools we recommend. There are other solutions to the same problems that are fine to use if they fit better into your workflow.
Conda#
Conda is a generic package manager. You can think of it like pip, but where anything can be a package (e.g. Python itself, scientific packages like mpich, petsc, fenics-dolfinx).
Key points, coming from pip/venv:
creates environments, like
venvPython itself is just another package
Can express proper dependencies across languages
All packages are binary, there’s no “install from source, if needed”
conda-forge is a community-maintained collection of over 20,000 conda packages
miniforge is the best way to get started with conda
Basic conda commands#
conda |
pip/venv |
|---|---|
|
|
|
|
`conda activate –name myproject |
|
|
|
|
|
|
|
Sample environment.yml#
channels:
  - conda-forge
dependencies:
  - python=3.10
  - fenics-dolfinx
  - mpich
Create an environment from an environment file:
conda env create -n my-paper -f environment.yml
conda-lock#
conda-lock is a tool for creating “lock files” for conda environments, like pip-compile, but for conda:
conda install conda-lock
conda-loc lock --platform linux-64 --platform osx-arm64 -f environment.yml
DEMO#
conda demo
Containers (Docker)#
Docker is a tool for packaging an application and all its dependencies, including the operating system, together in the form of images and containers. Typical use looks like:
Pull an image from a remote registry (or build the image from source)
Create a container (a running instance of an image)
Runs some code inside the container
Stop and remove the container
Basic docker commands#
Pull image
docker pull <image name>
e.g.
docker pull ghcr.io/scientificcomputing/fenics:2023-08-14
Start new container (set working directory to
/home/sharedand share this directory with your current working directory)docker run --name=my-research-code -w /home/shared -v $PWD:/home/shared -it ghcr.io/scientificcomputing/fenics:2023-08-14
Exit container with
Ctrl+DorexitStart existing container
docker start my-research-code
Stop running container
docker stop my-research-code
Remove existing container
docker rm my-research-code
List downloaded images
docker images
List containers (omit
-ato only list running containers)docker ps -a
Demo - Running jupyter inside docker#
If you are used to GUI applications (e.g. with windows), being restricted to a terminal inside a container may be limiting. Fortunately, you can connect to containers over the network, meaning that web-based UIs like Jupyter work in containers.
To run a web UI like Jupyter:
docker run \
  --rm \
  -w $PWD \
  -v $PWD:$PWD \
  -u $(id -u) \
  -p 127.0.0.1:8888:8888 \
  my-image jupyter lab --ip=0.0.0.0
The key points here:
--portforwards the local port127.0.0.1:8888to the port in the container (also 8888, but could be different)Because of network namespaces, jupyter must listen on the non-default ip
0.0.0.0to be connectable from outside the container
Docker development workflow#
To make a docker image:
Write a
Dockerfilewith instructions on how to build and install the dependenciesBuild an image from the Dockerfile
Push this to a registry (optional)
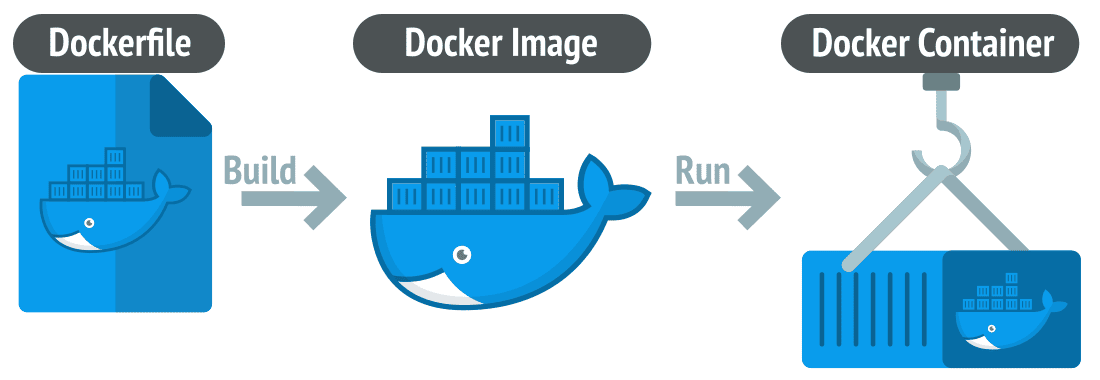
Taken from https://linuxiac.com/what-is-docker-container/
Dockerfile#
Dockerfiles are a series of directives, each of which modify the filesystem, creating a layer.
The result of a series of layers is an image
FROM ghcr.io/scientificcomputing/fenics:2023-08-14

WORKDIR /repo

# Copy requirements.txt first so that we done need to reinstall in case another file
COPY requirements.txt /tmp/requirements.txt
RUN python3 -m pip install --no-cache-dir --upgrade pip \
 && python3 -m pip install --no-cache-dir -r requirements.txt
# collect
COPY . /example-paper-fenics
RUN cd /example-paper-fenics \
 && python3 -m pip install .
USER 1000
CMD ["jupyter", "lab", "--ip=0.0.0.0"]
We maintain some docker images for scientific computing#
What to choose?#
Use python virtual environments if you
have only python dependencies
Use conda if
you rely on non-Python packages (e.g C libraries, Tensorflow, FEniCS)
all packages exist on conda (conda-forge / bioconda)
Use docker if you
need full control over the environment
require additional packages that are hard to install
need the development version of a non-Python dependency (e.g. FEniCS)
Someone else already maintains an image with what you need!